Thursday, April 7, 2016

TIE 2016 Presentation Materials

iPad Classroom Management using Meraki Systems Manager 
Monday, 10:55AM -  11:50AM
Fontenelle A

Thanks to everyone who attended the SME session.  Below are some resources that cover what was discussed.  Feel free to contact me if you have any questions on what we covered.

Meraki - Teacher's Assistant Introduction
https://meraki.cisco.com/blog/2015/05/systems-manager-your-new-teaching-assistant/

Meraki - Teacher's Assistant Posts
https://meraki.cisco.com/blog/tag/teachers-assistant/


Tuesday, February 2, 2016

Display Device-Assignable Status in Meraki SME

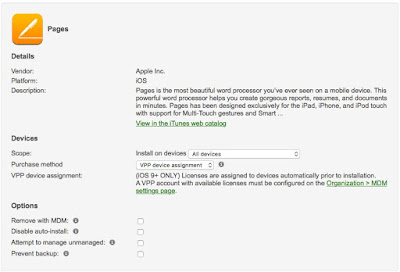
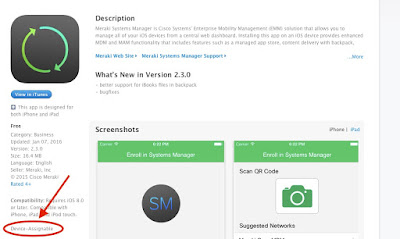
One of the most common questions I have had with app assignment since Meraki introduced support for iOS 9 is deployment problems with apps that are not device-assignable.  If an app is not device assignable and you have not granted a VPP license to the AppleID that is signed in on the device, the user will be prompted to enter an AppleID and password.  If a developer has opted to allow their app to utilize device assignment, Device-Assignable will be displayed on the app description page from the VPP portal.  (See Below)

If the app is not yet device assignable, I would recommend contacting the developer and requesting that they update their app and enable device-assignment.

If you want to see which apps are device assignable from the Meraki SME Dashboard perform the following steps.

  • Go to Systems Manager > VPP
  • Click the + symbol on the right side of the column headings
  • Check the box next to Device-assignable
The Device-assignable column should now be visible and display a "Y" or "N" to show whether an app is device assignable.  Of course Y=Yes and N=No.


Thursday, October 8, 2015

Meraki SME Device App Assignment

Apple made a huge announcement at WWDC 15 that iOS 9 would support device app assignment.  Gone are the days of using Configurator, VPP codes and multiple AppleIDs for those of us who manage carts of iPads as well.  Meraki quietly released an update that added this feature to organizations who have Systems Manager Enterprise.  Sorry, if you are still on Legacy Systems Manager this feature will be unavailable.

I've been testing it this week and it has been solid thus far.  I'm going to give a brief overview on the setup below.

Enable Device Assignment

Before you can use Device Assignment you must enable it for your organization.

Go to Organization > MDM

Under the Apple VPP Managed Distribution there is a new column titled Device assignment.  You have the option to disallow access, allow any network, or only specific networks to utilize the VPP licenses.


Assign Apps to Devices

This is where iOS admins will save a lot of time.  Since we no longer need to assign a license to an AppleID, we can go right to the App assignment page.

Go to Systems Manager > Apps

Click Add New > iOS App

Search for an app you already have a VPP license for.  Remember, you need to "purchase" licenses from VPP even if it is a free app.

Click the Add button next to the app you want to add.


Now we need to set the scope for the app and the purchase method.

First, set the scope for the devices that you want to receive the app.

Next, change the purchase method to VPP Device Assignment

If you want the app to install automatically, make sure the Disable auto-install box is unchecked.

Click Save Changes


The app should now push out to the device within a few minutes.  If you are impatient like me, you can click on the Re-push to missing link to speed things up.

Troubleshooting

  • Device prompts for AppleID
    • Make sure you have VPP licenses available for the apps you are pushing out.
    • Ensure you have enabled the VPP account for device assignment on the correct network.


Tuesday, April 21, 2015

TIE 2015 Slides

Hello everyone,

Thanks for attending the session at TIE 2015 on Meraki Systems Manager.  I have updated the slide deck and made some changes in response to some of the questions from the sessions.

Jordan

Slide Deck

Thursday, January 15, 2015

Disable LanSchool Audio (Speak) Feature on Macs

To disable the ability to listen to the microphone on client computers as well as the ability to speak to client computers follow these steps:


  • Download the installation source from Stone-ware.
  • Launch the lanschool_teacher.dmg and navigate to the Mac > Utilities folder.


  • Double click on DisableAudio.zip to extract the file.
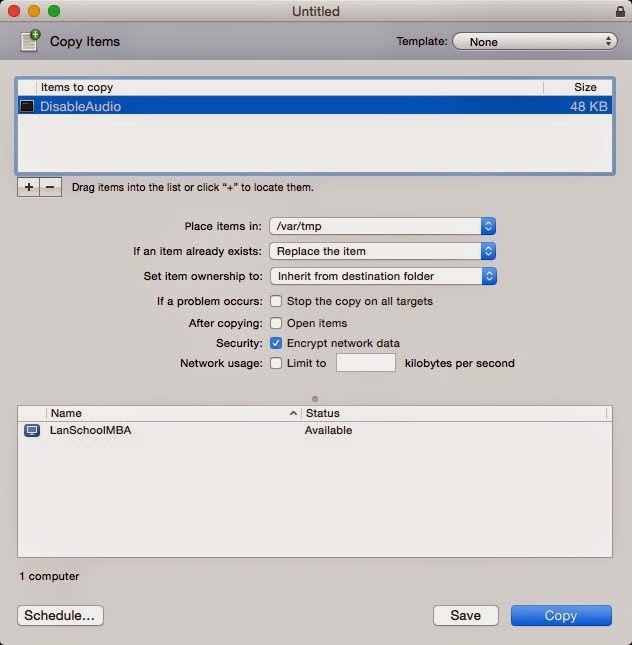
  • Use Apple Remote Desktop to copy the utility to the teacher machines.
  • Copy the utility DisableAudio to the teacher machines.  We use /var/tmp as our location.


  • Run DisableAudio with no parameters to disable the ability to listen or speak with client machines.
  • Use ARD to send a UNIX command to the client to run DisableAudio as root.
  • The teacher will need to quit and relaunch LanSchool for the change to take effect.  The Speak button should now be greyed out in the Teacher console.

Enable the Audio (Speak) Feature


To enable the audio speak feature, we will use the same procedure except for the UNIX command.  This time we want to add the FALSE parameter.


The teacher will need to close and reopen LanSchool for the change to take effect.  The speak button should now be available.

Thursday, October 30, 2014

Adding Keychain Menu to the Mac Menu Bar with Profile Manager

Now that support has all but been dropped for MCX and Workgroup Manager, it is time to start pushing out our settings and customizations with Profile Manager.  I will be making a series of posts on using Profile Manager to apply settings to the menu bar in OS X.

I am using user groups with nested AD users to apply the settings, your environment may be different.

  • Login to Profile Manager
  • Click on Groups and select the group you want to apply settings to.
  • Clic Settings
  • Scroll all the way to the bottom and click on Custom Settings.
  • In the preference domain type com.apple.systemuiserver.plist
  • Under Property list values, type the following in the key field:  /Applications/Utilities/Keychain Access.app/Contents/Resources/Keychain.menu
  • Select String for the type.
  • Click OK.
  • Be sure to click Save to apply the settings.
The clients should have the Keychain menu icon the next time they login.


Friday, October 3, 2014

Add Users to VPP in Meraki

When using Meraki Systems Manager, free apps will push out just fine without being assigned a license.  The users will simply be prompted for their Apple ID and password.  To use managed distribution and deploy paid apps the users have to be invited to VPP.

To invite users to participate in VPP:

1.  Login to Meraki Systems Manager
2.  Go to MDM > VPP
3.  Click the User Management tab
4.  Click +Add User
5.  Enter the name and email of the user.
6.  Check Send invitations automatically and click Save

From the user's iOS device:

1.  Access the user's email account.
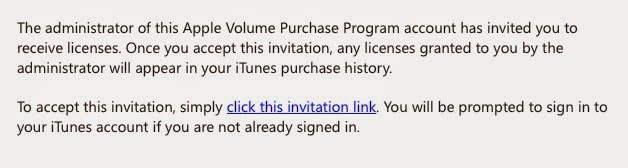
2.  Open the invitation email from Meraki.


3.  Click the invitation link.
4.  After being redirected to the App Store, agree to the terms and conditions.
5.  Click Ok after the VPP assignment has been confirmed.

Now app licenses should be able to be assigned to individual users for paid apps.

Thursday, September 25, 2014

Add a Web Clip Profile to Meraki Systems Manager

Use these steps if you want to create a new profile with the web clip(s).

Go to MDM > Profiles

Click +Add New > New mobile profile.

Set the scope to assign this to the following devices.

Click Save Settings.

Click Edit Profile Settings

Click Web Clips

Click Create a Web Clip


Fill in the Label field.  This is the text that will be displayed under the icon for the web clip.

Click Save Changes.

The devices should add the Web Clip to the home screen the next time they check in.

Monday, September 15, 2014

VPP Licenses Not Showing Up in Meraki Systems Manager

After purchasing app license from the Apple Education Volume Purchase Program website the licenses should be available via the Systems Manager dashboard under MDM > VPP.  It may take some time for the transaction to be processed after making the purchase.  The license will not be available to Meraki until the transaction has completely processed.

The following steps can be used to force Meraki SM to sync the licenses with Apple VPP.


  • Go to MDM > Meraki
  • Click the Force sync now button on the upper right side of the window.


Once completed, the licenses that have been processed by VPP should now be available.  This process can take some time if you have several thousand licenses to sync.  I have seen it take over 30 minutes to complete with larger installations.

Thursday, September 11, 2014

Recover Data from JVC Everio GZ-MG330HU

Recently I had a client bring me a JVC Everio GZ-MG330HU camcorder that had come in contact with water.  After which it would power on, but display a message that the temperature was too low.  This prevented it from connecting to a computer to download the data since it would power off shortly after the error.

The JVC Everio GZ-MG330HU is a hybrid HDD/micro SD hybrid camera with a built-in 30GB hard drive.

Since this was the first time I had had to recover data from one of these models, I started to take it apart to see what type of hard drive the device was using.  This model had a 1.8-inch Toshiba hard disk drive.  In the past I had managed a fleet of Dell Latitude XT tablets.  The Latitude XT also had a 1.8-inch drive.

To start the recovery process I removed the hard drive from the XT and removed the zif cable.  I then attached the zig cable to the camcorder's hard drive and plugged it into the XT.  Since the drive doesn't have a usable OS, I decided to use Linux Mint on a USB flash drive to recover the data.  After booting into Mint, I was able to see the drive and files immediately.  I attached another external USB drive and was able to recover over 21 GB of data that had been stored on the drive.

There are other types of adapters that could be used, but I happened to have one of these on the shelf, saving me the time and money of ordering an adapter.

Monday, September 8, 2014

Silently Install iOS Apps with Meraki to an iPad Cart

A bit of background for this post.  I work for a quickly growing school district on a team that manages around 4000 Macs, iPads and Chromebook.  We have approximately 1200 iPads that are in carts for each grade level to use.  We needed a method to silently push the apps to each of the carts.  The method we chose was to create a different Apple ID for each cart at each school and use Apple's VPP Managed Distribution.

NOTE:  You will need to invite the user accounts via VPP before proceeding.  Follow my previous post here for instructions.
  1. Purchase the paid or free apps via the Apple VPP website.
  2. Go to meraki.com and login to your Systems Manager dashboard.
  3. Go to MDM > VPP
  4. Click the Licensed Applications tab if it isn’t already selected.
  5. Check the name of the app you want to assign to an Apple ID.
NOTE:  If the app you are looking to assign is listed, but has been purchased from the Apple VPP website, you may need to sync the Apple API.  Click the Force sync now button in the upper right of the window.
  1. Check the box next to the user(s) (Apple IDs) you want to assign the app to.
  2. Click Grant license to user(s)
Now that the license has been granted, we need to assign the app to the devices.
  1. Go to MDM > Apps
  2. Click + Add new > iOS App
  3. Search for the app.
  4. Click Add next to the app to be assigned.
  5. Set the scope to select which devices should receive the app.
  6. Click Save
OPTIONAL:  We usually check the box next to Remove with MDM.  This way if a user removes the management profile, the apps will also be removed.


Troubleshoot Supervised iPads Prompting for Apple ID Password

After configuring our iPad carts and successfully deploying apps silently using Meraki Systems Manager, we were surprised when they suddenly started prompting for an Apple ID password.  After a few days of troubleshooting and a call to our Apple Engineer, we discovered that when certain restrictions are applied to a device running iOS 7, the device will prompt for a password when assigning apps.  We had applied the profiles after deploying some apps, which explains why we didn't have this problem immediately.

So far, we have tested and found that restrictions to the store(s), content/age restrictions, and requiring a password when installing apps will cause this behavior.

Hopefully, this will save others when troubleshooting silently pushing apps to iOS devices.

Add Apple VPP Accounts to Meraki Systems Manager

  1. Login to Meraki Systems Manager
  2. Go to MDM > VPP
  3. Click on User Management
  4. Click +Add User
  5. Enter the name and the email for the account you want to add.
  6. Go to the iPad you want to use this account with.  Add the email account and sign into the App Store.  You should receive an email invitation from Meraki inviting you to participate in the VPP program.
  7. Click the link and accept the prompts when the App Store opens.
  8. When the App Store confirms the assignment was successful you are now ready to assign apps to this Apple ID.
  9. Go back to Meraki MDM > VPP > User Management and the account should now show Associated.  If not you may have to click Force sync now.
IMPORTANT:  If this is a cart of iPads you can share the same account on each iPad the cart.  Be sure to only accept one VPP invitation on a single iPad.  If you accept invitations for two different accounts on a single iPad an error will be presented in the User Management section of Systems Manager.

Friday, January 24, 2014

Problems Updating IBM POS to Windows 7

Upon finding out that we can now install our own Food Service Point of Sale software we decided to update some of our old IBM POS 4846-545 from Windows Embedded POSReady 2009 to Windows 7.  We wanted to finish this sooner than later due to the end of Windows XP support as well as XP becoming a bit sluggish on this hardware.  An easy enough task, however, the Windows 7 installer would hang after the Windows 7 splash screen.

Knowing that these systems were outdated by a couple of years when we purchased them, I assumed there was likely a BIOS update available from IBM to fix the problem.  Sure enough, I found a BIOS update (version X6KT190) that had been released on 1-5-2011.  Our POS systems were still running X6KT170 which had been released in 2008.

Thankfully, there is an executable version of the BIOS update that can be started from within Windows, saving the need to dig out the old USB floppy drive.

After updating the BIOS, the Windows 7 Setup screen was displayed and we were able to install Windows 7 without any problem.  All of the drivers also had Windows 7 support.

IBM POS 4846-545 BIOS

Restore Windows RT on an Asus VivoTab RT

We are currently piloting 30 ASUS VivoTab RT tablets.  The pilot was going pretty well, except for a couple devices displaying an error at startup, "Your PC needs to be repaired."

To repair the system we created a USB recovery drive from one of our working systems.

To perform the recovery:
  1. Connect the recovery drive to the VivoTab RT.
  2. While holding down the volume down button, press the power button.  Release both after the Asus logo appears.
  3. The recovery will then load.
  4. Select the US keyboard layout.
  5. Touch Troubleshoot
Reset your PC
  1. Tap Skip this Drive
  2. Tap Windows RT 8.
  3. A screen titled Reset your PC appears warning that all personal files and apps will be removed and all PC settings will be changed to their defaults.  Since there are no files that we need to backup click Next.  NOTE:  This will destroy all of the data on the device.  Be sure there is nothing on the device that you want before clicking Next.
  4. Touch Yes, repartition the drives.
  5. Touch Just remove my files.
  6. Touch Reset.
A black screen with the ASUS logo should be displayed with Resetting your PC and the status.

After the restore is complete Windows RT will prompt for region, language and other settings as usual.

Thursday, October 3, 2013

Enroll iOS Device in Lightspeed Systems MDM with Configurator

Since we manage nearly 2000 iOS devices, I prefer to have my deployment as streamlined as possible.  I prefer to touch the devices as little as possible.  Nothing bothers me more than having to manually input settings on each device.  To ease management of our iOS devices we purchased an MDM solution that Lightspeed Systems offers.

We are currently using Configurator to supervise the iOS devices and enroll them in the MDM.  Lightspeed also allows devices to be enrolled in the MDM via a web link if you are using a BYOD model.  Again, since we are going for the least number of steps it works best to have Configurator perform the enrollment.

Download Enrollment Profile

Before we can perform the enrollment we need to download the enrollment profile from the Lightspeed Mobile Manger.

1.  Login to the Lightspeed Mobile Manager.

2.  Click on the chain icon to the right of your organizations name.


Mobile Manager should now display two enrollment options as pictured below.  Bulk Enrollment is for use with Apple Configurator and Individual Enrollment is for enrollment via Safari.  For this scenario we want to use the Bulk Enrollment option.

3.  Click on Download Profile to download the enrollment profile..  The filename will include your organization name with the extension .mobileconfig.


Install Enrollment Profile

4.  Open Apple Configurator.

5.  Click the + under the profile section and select Import Profile...  Browse to the enrollment profile that was downloaded previously and select open.

6.  Check the box next to the imported profile.

Now you can hook up your iOS devices, set your desired options and click Prepare.  The device should then be enrolled in Lightspeed Mobile Manager.  This does require some patience and is by no means an exact science.  You must also have a wireless profile set to install on your iOS device while being prepared.  If you do not the enrollment will fail.

I have found that it works best to apply the Enrollment Profile after preparing/supervising the devices.  After the device has successfully been prepared/supervised it is easy to apply the enrollment profile.  This method ensures that the wireless profile has a chance to be applied and gives the device time to connect to the wireless network.

The following steps outline how to apply the Enrollment Profile after supervising the devices.

Apply Enrollment Profile

1.  Click on the Supervise tab.

2.  Select the device(s) that you want to apply the Enrollment Profile to.

3.  Check the box next to the Enrollment Profile and click Apply.

Configurator should now enroll the device in the Lightspeed MDM.


Create Supervised Backup in Configurator

This post will cover creating a backup of a supervised iPad for use configuring other iPads.

1.  Prepare and Supervise Device

First we want to connect an iPad that has not been supervised yet.

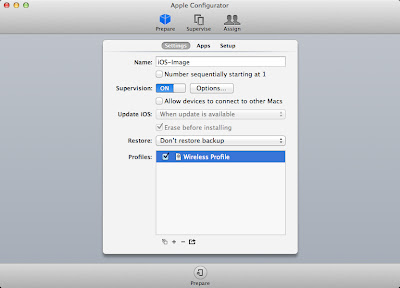
Enter the name of your device, turn Supervision ON, change the Update iOS drop down to When Update is Available.  Erase before installing will be checked by default.

**Note:  Supervising the device will erase all content!**

Set the Restore drop down to Don't restore backup.

I usually apply my wireless profile just to make sure it is working.  This isn't something that will be retained when you make the backup.  In other words, when restoring the backup to another iOS device, the wireless settings are lost.

Click Prepare.

If you haven't entered your organization's information yet, you will be prompted to do so.


If this is the first time you have installed a particular version of iOS on a device, this may take some time since it has to download the IPSW.


2.  Disable Lock Screen Text

I recommend disabling the lock screen text.  In the past I have had the device name be saved as an image when taking the backup.  When this happens all the devices have the same text on the background as well as the text that Configurator adds.  It can easily be enabled after the backup is complete.

To disable lock screen text:

Go to the Apple Configurator menu and click Preferences.

Click the lock screen icon.

Change the Text: radio button to None.


3.  Creating the Backup

When the device has finished the supervision process it should be listed under the Supervise tab in Configurator.

Go through and configure your iPad options such as icon placement, lock screen and home screen picture, etc.

Reconnect the iPad if it isn't already connected.

Click on the Supervise tab.

Select the iPad you wish to backup.

Click on the Restore: drop down menu and select Create Backup...

Enter the name for your backup when prompted and click Create Backup.


4.  Restoring the Backup

Now you can apply the backup to new devices you are supervising.

From the Prepare tab, be sure to change the restore drop down to the name of the backup that was created in step 3.

Be sure to enable the lock screen text that was disabled in step 2 before starting the prepare process.

Friday, April 26, 2013

Quickly NetBoot from a Different Subnet than the NetBoot Server

It was necessary to quickly NetBoot a couple of Macs from a different subnet in our organization than the subnet the NetBoot server is hosted on.  After some searching I came across this command:

sudo Bless --netboot --server bsdp://x.x.x.x --nextonly

Replace the x's with the IP address of your NetBoot server and run this command from Terminal or ARD.  Reboot your Mac and it should attempt to NetBoot to your server.

Monday, April 15, 2013

Managed Printers Using Incorrect Drivers

Recently we started updating our student MacBook Airs to OS 10.8.3 which has gone really well.  However, over the past few weeks we noticed some students were having trouble printing to some of our HP LaserJet 4250 printers.  The printer would produce a page, however, it was a single line of gibberish.  Upon further examination, I noticed that the printer had been using a generic driver.

We use Open Directory for our Mac management and push the printer settings to the clients through Workgroup Manager.  All of the 10.7 clients would detect the printer model and use the correct driver.  After a web search I found that I could specify the PPD that should be used in Workgroup Manager.

To remedy this problem:

1.  You must first make sure the drivers are available to the client.  I am going to make the drivers available to my clients as a required install via Munki.

2.  If you know the driver is available on the client connect to your OD server with Workgroup Manager.

3.  Select the user or group that has the printer settings assigned to it.

4.  Click the Preference tab, then click the Details tab.

5.  Double-click the com.apple.mcxprinting entry.


6.  Click the triangle next to Always.

7.  Click the triangle next to the printer you want to modify.

8.  Select the printer you want to modify and click the New Key button.

9.  Type PPDPath for the new key name.

10.  Set the type to String

11.  Change the value to the path where the PPD file is located on the client.
  • For my LaserJet 4250 it was:
file://localhost/Library/Printers/PPDs/Contents/Resources/HP LaserJet 4250.gz


Reboot the Mac, log in and you should now have the correct driver listed for the printer.

Friday, April 12, 2013

Update Adobe Flash on Macs with Munki

Due to the high volume of updates for Adobe Flash and Java I decided I needed a central way to manage updates for my 300+ Macs.  ARD works well for deploying to desktops that are always connected to the network, but it makes it harder to ensure that all mobile users have the updates available to them to install.  After some research I decided to use Munki.  It is easy to use, set up and manage. You can also point Munki's Managed Software Update application at your Apple SUS server and install Apple updates for users who don't have administrative rights.

Here are the steps to deploy Adobe Flash via Munki.  I am deploying version 11.7.700.169.
  • Download the DMG installer from the Adobe Flash Player Distribution site.
  • Open the install_flash_player_11_osx.dmg file to mount it.
  • Open Terminal and type the following commands:
/usr/local/munki/munkiimport /Volumes/Flash\ Player/Install\ Adobe\ Flash\ Player.app/Contents/Resources/Adobe\ Flash\ Player.pkg
  • If you already have Adobe Flash in your Munki repo you will be prompted to use the exisiting item as a template.  Type 'Y' if you would like to do so.
Note:  The following steps may vary depending on how you have set up your environment and naming conventions.
  • Enter the following:
Item name:  Adobe Flash (Version)
Display Name:  Adobe Flash (Version)
Description:  Adobe Flash (Version) Released (Date)
Version:  (Version)
Catalogs:  production


  • When prompted, type 'Y' to confirm you would like to import the item.
  • When prompted, type 'Y' to rebuild the catalogs.

I prefer to use MunkiWebAdmin to manage my catalogs and manifests.  Now that we have added the Adobe Flash install to our repo, we need to assign it to a manifest.

  • Log into MunkiWebAdmin
  • Click on Manifests
  • Click the manifest you would like to apply the update to and click the Edit button.
  • Click the green "+" next to Managed Installs.
  • Type in the Item name for the package we uploaded earlier.
  • Click Save.
Now the update should be available via Managed Software Update on any Macs that are set to use this manifest.

I would recommend going to http://www.adobe.com/software/flash/about/ to verify that Adobe Flash was in fact updated.

I have most of my clients set to require the user logout to install the updates.  This keeps users from having applications open that may need to be closed to apply the update.  If Safari is open when you run this update, it will need to be Quit and reopened to activate the latest plug-in version.

For more information on Munki, visit their project page:

http://code.google.com/p/munki/