1. Prepare and Supervise Device
First we want to connect an iPad that has not been supervised yet.
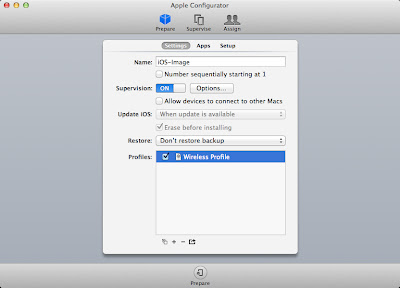
Enter the name of your device, turn Supervision ON, change the Update iOS drop down to When Update is Available. Erase before installing will be checked by default.
**Note: Supervising the device will erase all content!**
Set the Restore drop down to Don't restore backup.
I usually apply my wireless profile just to make sure it is working. This isn't something that will be retained when you make the backup. In other words, when restoring the backup to another iOS device, the wireless settings are lost.
Click Prepare.
If you haven't entered your organization's information yet, you will be prompted to do so.
If this is the first time you have installed a particular version of iOS on a device, this may take some time since it has to download the IPSW.
2. Disable Lock Screen Text
I recommend disabling the lock screen text. In the past I have had the device name be saved as an image when taking the backup. When this happens all the devices have the same text on the background as well as the text that Configurator adds. It can easily be enabled after the backup is complete.
To disable lock screen text:
Go to the Apple Configurator menu and click Preferences.
Click the lock screen icon.
Change the Text: radio button to None.

3. Creating the Backup
When the device has finished the supervision process it should be listed under the Supervise tab in Configurator.
Go through and configure your iPad options such as icon placement, lock screen and home screen picture, etc.
Reconnect the iPad if it isn't already connected.
Click on the Supervise tab.
Select the iPad you wish to backup.
Click on the Restore: drop down menu and select Create Backup...
Enter the name for your backup when prompted and click Create Backup.

4. Restoring the Backup
Now you can apply the backup to new devices you are supervising.
From the Prepare tab, be sure to change the restore drop down to the name of the backup that was created in step 3.
Be sure to enable the lock screen text that was disabled in step 2 before starting the prepare process.
