Thursday, October 3, 2013

Enroll iOS Device in Lightspeed Systems MDM with Configurator

Since we manage nearly 2000 iOS devices, I prefer to have my deployment as streamlined as possible.  I prefer to touch the devices as little as possible.  Nothing bothers me more than having to manually input settings on each device.  To ease management of our iOS devices we purchased an MDM solution that Lightspeed Systems offers.

We are currently using Configurator to supervise the iOS devices and enroll them in the MDM.  Lightspeed also allows devices to be enrolled in the MDM via a web link if you are using a BYOD model.  Again, since we are going for the least number of steps it works best to have Configurator perform the enrollment.

Download Enrollment Profile

Before we can perform the enrollment we need to download the enrollment profile from the Lightspeed Mobile Manger.

1.  Login to the Lightspeed Mobile Manager.

2.  Click on the chain icon to the right of your organizations name.


Mobile Manager should now display two enrollment options as pictured below.  Bulk Enrollment is for use with Apple Configurator and Individual Enrollment is for enrollment via Safari.  For this scenario we want to use the Bulk Enrollment option.

3.  Click on Download Profile to download the enrollment profile..  The filename will include your organization name with the extension .mobileconfig.


Install Enrollment Profile

4.  Open Apple Configurator.

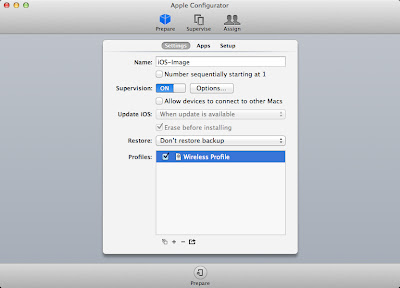
5.  Click the + under the profile section and select Import Profile...  Browse to the enrollment profile that was downloaded previously and select open.

6.  Check the box next to the imported profile.

Now you can hook up your iOS devices, set your desired options and click Prepare.  The device should then be enrolled in Lightspeed Mobile Manager.  This does require some patience and is by no means an exact science.  You must also have a wireless profile set to install on your iOS device while being prepared.  If you do not the enrollment will fail.

I have found that it works best to apply the Enrollment Profile after preparing/supervising the devices.  After the device has successfully been prepared/supervised it is easy to apply the enrollment profile.  This method ensures that the wireless profile has a chance to be applied and gives the device time to connect to the wireless network.

The following steps outline how to apply the Enrollment Profile after supervising the devices.

Apply Enrollment Profile

1.  Click on the Supervise tab.

2.  Select the device(s) that you want to apply the Enrollment Profile to.

3.  Check the box next to the Enrollment Profile and click Apply.

Configurator should now enroll the device in the Lightspeed MDM.


Create Supervised Backup in Configurator

This post will cover creating a backup of a supervised iPad for use configuring other iPads.

1.  Prepare and Supervise Device

First we want to connect an iPad that has not been supervised yet.

Enter the name of your device, turn Supervision ON, change the Update iOS drop down to When Update is Available.  Erase before installing will be checked by default.

**Note:  Supervising the device will erase all content!**

Set the Restore drop down to Don't restore backup.

I usually apply my wireless profile just to make sure it is working.  This isn't something that will be retained when you make the backup.  In other words, when restoring the backup to another iOS device, the wireless settings are lost.

Click Prepare.

If you haven't entered your organization's information yet, you will be prompted to do so.


If this is the first time you have installed a particular version of iOS on a device, this may take some time since it has to download the IPSW.


2.  Disable Lock Screen Text

I recommend disabling the lock screen text.  In the past I have had the device name be saved as an image when taking the backup.  When this happens all the devices have the same text on the background as well as the text that Configurator adds.  It can easily be enabled after the backup is complete.

To disable lock screen text:

Go to the Apple Configurator menu and click Preferences.

Click the lock screen icon.

Change the Text: radio button to None.


3.  Creating the Backup

When the device has finished the supervision process it should be listed under the Supervise tab in Configurator.

Go through and configure your iPad options such as icon placement, lock screen and home screen picture, etc.

Reconnect the iPad if it isn't already connected.

Click on the Supervise tab.

Select the iPad you wish to backup.

Click on the Restore: drop down menu and select Create Backup...

Enter the name for your backup when prompted and click Create Backup.


4.  Restoring the Backup

Now you can apply the backup to new devices you are supervising.

From the Prepare tab, be sure to change the restore drop down to the name of the backup that was created in step 3.

Be sure to enable the lock screen text that was disabled in step 2 before starting the prepare process.


Friday, April 26, 2013

Quickly NetBoot from a Different Subnet than the NetBoot Server

It was necessary to quickly NetBoot a couple of Macs from a different subnet in our organization than the subnet the NetBoot server is hosted on.  After some searching I came across this command:

sudo Bless --netboot --server bsdp://x.x.x.x --nextonly

Replace the x's with the IP address of your NetBoot server and run this command from Terminal or ARD.  Reboot your Mac and it should attempt to NetBoot to your server.

Monday, April 15, 2013

Managed Printers Using Incorrect Drivers

Recently we started updating our student MacBook Airs to OS 10.8.3 which has gone really well.  However, over the past few weeks we noticed some students were having trouble printing to some of our HP LaserJet 4250 printers.  The printer would produce a page, however, it was a single line of gibberish.  Upon further examination, I noticed that the printer had been using a generic driver.

We use Open Directory for our Mac management and push the printer settings to the clients through Workgroup Manager.  All of the 10.7 clients would detect the printer model and use the correct driver.  After a web search I found that I could specify the PPD that should be used in Workgroup Manager.

To remedy this problem:

1.  You must first make sure the drivers are available to the client.  I am going to make the drivers available to my clients as a required install via Munki.

2.  If you know the driver is available on the client connect to your OD server with Workgroup Manager.

3.  Select the user or group that has the printer settings assigned to it.

4.  Click the Preference tab, then click the Details tab.

5.  Double-click the com.apple.mcxprinting entry.


6.  Click the triangle next to Always.

7.  Click the triangle next to the printer you want to modify.

8.  Select the printer you want to modify and click the New Key button.

9.  Type PPDPath for the new key name.

10.  Set the type to String

11.  Change the value to the path where the PPD file is located on the client.
  • For my LaserJet 4250 it was:
file://localhost/Library/Printers/PPDs/Contents/Resources/HP LaserJet 4250.gz


Reboot the Mac, log in and you should now have the correct driver listed for the printer.

Friday, April 12, 2013

Update Adobe Flash on Macs with Munki

Due to the high volume of updates for Adobe Flash and Java I decided I needed a central way to manage updates for my 300+ Macs.  ARD works well for deploying to desktops that are always connected to the network, but it makes it harder to ensure that all mobile users have the updates available to them to install.  After some research I decided to use Munki.  It is easy to use, set up and manage. You can also point Munki's Managed Software Update application at your Apple SUS server and install Apple updates for users who don't have administrative rights.

Here are the steps to deploy Adobe Flash via Munki.  I am deploying version 11.7.700.169.
  • Download the DMG installer from the Adobe Flash Player Distribution site.
  • Open the install_flash_player_11_osx.dmg file to mount it.
  • Open Terminal and type the following commands:
/usr/local/munki/munkiimport /Volumes/Flash\ Player/Install\ Adobe\ Flash\ Player.app/Contents/Resources/Adobe\ Flash\ Player.pkg
  • If you already have Adobe Flash in your Munki repo you will be prompted to use the exisiting item as a template.  Type 'Y' if you would like to do so.
Note:  The following steps may vary depending on how you have set up your environment and naming conventions.
  • Enter the following:
Item name:  Adobe Flash (Version)
Display Name:  Adobe Flash (Version)
Description:  Adobe Flash (Version) Released (Date)
Version:  (Version)
Catalogs:  production


  • When prompted, type 'Y' to confirm you would like to import the item.
  • When prompted, type 'Y' to rebuild the catalogs.

I prefer to use MunkiWebAdmin to manage my catalogs and manifests.  Now that we have added the Adobe Flash install to our repo, we need to assign it to a manifest.

  • Log into MunkiWebAdmin
  • Click on Manifests
  • Click the manifest you would like to apply the update to and click the Edit button.
  • Click the green "+" next to Managed Installs.
  • Type in the Item name for the package we uploaded earlier.
  • Click Save.
Now the update should be available via Managed Software Update on any Macs that are set to use this manifest.

I would recommend going to http://www.adobe.com/software/flash/about/ to verify that Adobe Flash was in fact updated.

I have most of my clients set to require the user logout to install the updates.  This keeps users from having applications open that may need to be closed to apply the update.  If Safari is open when you run this update, it will need to be Quit and reopened to activate the latest plug-in version.

For more information on Munki, visit their project page:

http://code.google.com/p/munki/

Thursday, April 4, 2013

Quickly Create SCCM Collection for All Windows Clients

I was deploying a handful of updates today and I wanted to deploy the updates to all of my Windows clients, but not my servers.  I am using System Center Configuration Manager 2012 for the deployment so it is easy to create custom computer collections.  I used the following steps to include all computers that have a Windows client OS in a collection called All Windows Clients.

1.  Open the System Center 2012 Configuration Manager Console.

2.  Navigate to Assets and Compliance > Device Collections.

3.  Click Create Device Collection.


4.  Enter the name All Windows Clients

5.  Set the Limiting Collection to All Systems and click Next.


6.  Click Add Rule > Direct Rule.

7.  In the Create Direct Membership Rule Wizard window, change the Attribute Name to Operating System Name and Version.

8.  In the value field, type %workstation% and click Next.


9.  You should now see all of the devices that match the value we typed in.  If they match, click Select All to add them and click Next.

10.  A summary of all the workstations that match the rule will now be displayed.  Review it and click Next.  Click Close when the wizard completes.

11.  From the Create Device Collection Wizard window, place a check next to Use Incremental Updates for this Collection.

12. Change the schedule if desired and click Next.

13.  Review the changes and click Next to create the new collection.  Close the wizard.

14.  Click on the All Windows Clients device collection and select Refresh.

To create an All Windows Servers group, replace %workstation% with %server%.  This will gather all computers with a Windows Server OS.

Thursday, March 28, 2013

Export Trust and Enrollment Profiles - Part 3

Part 3:  Export Trust and Enrollment Profiles

Now that Profile Manger has been setup we need to prepare for device enrollment.  I prefer to use Apple Configurator to prepare and enroll the iOS devices, then manage them with Profile Manager 2.  Before we prepare and enroll the devices we need to save the trust profile and enrollment profile from Profile Manager.

Setup

This setup assumes that you have Profile Manger 2 configured and have installed Apple Configurator.  If you have not setup Configurator, it can be downloaded for free from the Mac App Store.

I would perform the following steps from the computer that Configurator is installed on.

Download Trust and Enrollment Profiles

1.  Log into Profile Manager 2 with an account authorized for Profile Manger.


2.  Click on your username in the upper right corner of the Profile Manger page.


3.  Click Download Trust Profile.  The trust profile will now be saved to your Downloads folder.  We will use this shortly.


4.  Click on the + in the lower left corner of Profile Manger 2 and click Enrollment Profile.  A new enrollment profile will now be created.

5.  Click on the title New Enrollment Profile and type the name of the enrollment profile.  I usually use the name of my organization.  i.e. MySchool Enrollment Profile


6.  There is a checkbox to Restrict use to devices with placeholders.  If you leave this checked you will need to use the Devices library to prestage your devices.  If it is unchecked any device can use this profile to join your PM2 server.

7.  Click Save, and confirm by clicking Save.


8.  Next click the Download button to download your enrollment profile to the Downloads folder.

NOTE:  10.7 and 10.8 may ask you if you want to enroll your Mac after the download is complete.  Since we are using this for our iOS devices, click Cancel.

We now have the profiles we need to enroll iOS devices in Profile Manger.