Monday, September 8, 2014

Silently Install iOS Apps with Meraki to an iPad Cart

A bit of background for this post.  I work for a quickly growing school district on a team that manages around 4000 Macs, iPads and Chromebook.  We have approximately 1200 iPads that are in carts for each grade level to use.  We needed a method to silently push the apps to each of the carts.  The method we chose was to create a different Apple ID for each cart at each school and use Apple's VPP Managed Distribution.

NOTE:  You will need to invite the user accounts via VPP before proceeding.  Follow my previous post here for instructions.
  1. Purchase the paid or free apps via the Apple VPP website.
  2. Go to meraki.com and login to your Systems Manager dashboard.
  3. Go to MDM > VPP
  4. Click the Licensed Applications tab if it isn’t already selected.
  5. Check the name of the app you want to assign to an Apple ID.
NOTE:  If the app you are looking to assign is listed, but has been purchased from the Apple VPP website, you may need to sync the Apple API.  Click the Force sync now button in the upper right of the window.
  1. Check the box next to the user(s) (Apple IDs) you want to assign the app to.
  2. Click Grant license to user(s)
Now that the license has been granted, we need to assign the app to the devices.
  1. Go to MDM > Apps
  2. Click + Add new > iOS App
  3. Search for the app.
  4. Click Add next to the app to be assigned.
  5. Set the scope to select which devices should receive the app.
  6. Click Save
OPTIONAL:  We usually check the box next to Remove with MDM.  This way if a user removes the management profile, the apps will also be removed.


Troubleshoot Supervised iPads Prompting for Apple ID Password

After configuring our iPad carts and successfully deploying apps silently using Meraki Systems Manager, we were surprised when they suddenly started prompting for an Apple ID password.  After a few days of troubleshooting and a call to our Apple Engineer, we discovered that when certain restrictions are applied to a device running iOS 7, the device will prompt for a password when assigning apps.  We had applied the profiles after deploying some apps, which explains why we didn't have this problem immediately.

So far, we have tested and found that restrictions to the store(s), content/age restrictions, and requiring a password when installing apps will cause this behavior.

Hopefully, this will save others when troubleshooting silently pushing apps to iOS devices.

Add Apple VPP Accounts to Meraki Systems Manager

  1. Login to Meraki Systems Manager
  2. Go to MDM > VPP
  3. Click on User Management
  4. Click +Add User
  5. Enter the name and the email for the account you want to add.
  6. Go to the iPad you want to use this account with.  Add the email account and sign into the App Store.  You should receive an email invitation from Meraki inviting you to participate in the VPP program.
  7. Click the link and accept the prompts when the App Store opens.
  8. When the App Store confirms the assignment was successful you are now ready to assign apps to this Apple ID.
  9. Go back to Meraki MDM > VPP > User Management and the account should now show Associated.  If not you may have to click Force sync now.
IMPORTANT:  If this is a cart of iPads you can share the same account on each iPad the cart.  Be sure to only accept one VPP invitation on a single iPad.  If you accept invitations for two different accounts on a single iPad an error will be presented in the User Management section of Systems Manager.

Friday, January 24, 2014

Problems Updating IBM POS to Windows 7

Upon finding out that we can now install our own Food Service Point of Sale software we decided to update some of our old IBM POS 4846-545 from Windows Embedded POSReady 2009 to Windows 7.  We wanted to finish this sooner than later due to the end of Windows XP support as well as XP becoming a bit sluggish on this hardware.  An easy enough task, however, the Windows 7 installer would hang after the Windows 7 splash screen.

Knowing that these systems were outdated by a couple of years when we purchased them, I assumed there was likely a BIOS update available from IBM to fix the problem.  Sure enough, I found a BIOS update (version X6KT190) that had been released on 1-5-2011.  Our POS systems were still running X6KT170 which had been released in 2008.

Thankfully, there is an executable version of the BIOS update that can be started from within Windows, saving the need to dig out the old USB floppy drive.

After updating the BIOS, the Windows 7 Setup screen was displayed and we were able to install Windows 7 without any problem.  All of the drivers also had Windows 7 support.

IBM POS 4846-545 BIOS

Restore Windows RT on an Asus VivoTab RT

We are currently piloting 30 ASUS VivoTab RT tablets.  The pilot was going pretty well, except for a couple devices displaying an error at startup, "Your PC needs to be repaired."

To repair the system we created a USB recovery drive from one of our working systems.

To perform the recovery:
  1. Connect the recovery drive to the VivoTab RT.
  2. While holding down the volume down button, press the power button.  Release both after the Asus logo appears.
  3. The recovery will then load.
  4. Select the US keyboard layout.
  5. Touch Troubleshoot
Reset your PC
  1. Tap Skip this Drive
  2. Tap Windows RT 8.
  3. A screen titled Reset your PC appears warning that all personal files and apps will be removed and all PC settings will be changed to their defaults.  Since there are no files that we need to backup click Next.  NOTE:  This will destroy all of the data on the device.  Be sure there is nothing on the device that you want before clicking Next.
  4. Touch Yes, repartition the drives.
  5. Touch Just remove my files.
  6. Touch Reset.
A black screen with the ASUS logo should be displayed with Resetting your PC and the status.

After the restore is complete Windows RT will prompt for region, language and other settings as usual.

Thursday, October 3, 2013

Enroll iOS Device in Lightspeed Systems MDM with Configurator

Since we manage nearly 2000 iOS devices, I prefer to have my deployment as streamlined as possible.  I prefer to touch the devices as little as possible.  Nothing bothers me more than having to manually input settings on each device.  To ease management of our iOS devices we purchased an MDM solution that Lightspeed Systems offers.

We are currently using Configurator to supervise the iOS devices and enroll them in the MDM.  Lightspeed also allows devices to be enrolled in the MDM via a web link if you are using a BYOD model.  Again, since we are going for the least number of steps it works best to have Configurator perform the enrollment.

Download Enrollment Profile

Before we can perform the enrollment we need to download the enrollment profile from the Lightspeed Mobile Manger.

1.  Login to the Lightspeed Mobile Manager.

2.  Click on the chain icon to the right of your organizations name.


Mobile Manager should now display two enrollment options as pictured below.  Bulk Enrollment is for use with Apple Configurator and Individual Enrollment is for enrollment via Safari.  For this scenario we want to use the Bulk Enrollment option.

3.  Click on Download Profile to download the enrollment profile..  The filename will include your organization name with the extension .mobileconfig.


Install Enrollment Profile

4.  Open Apple Configurator.

5.  Click the + under the profile section and select Import Profile...  Browse to the enrollment profile that was downloaded previously and select open.

6.  Check the box next to the imported profile.

Now you can hook up your iOS devices, set your desired options and click Prepare.  The device should then be enrolled in Lightspeed Mobile Manager.  This does require some patience and is by no means an exact science.  You must also have a wireless profile set to install on your iOS device while being prepared.  If you do not the enrollment will fail.

I have found that it works best to apply the Enrollment Profile after preparing/supervising the devices.  After the device has successfully been prepared/supervised it is easy to apply the enrollment profile.  This method ensures that the wireless profile has a chance to be applied and gives the device time to connect to the wireless network.

The following steps outline how to apply the Enrollment Profile after supervising the devices.

Apply Enrollment Profile

1.  Click on the Supervise tab.

2.  Select the device(s) that you want to apply the Enrollment Profile to.

3.  Check the box next to the Enrollment Profile and click Apply.

Configurator should now enroll the device in the Lightspeed MDM.


Create Supervised Backup in Configurator

This post will cover creating a backup of a supervised iPad for use configuring other iPads.

1.  Prepare and Supervise Device

First we want to connect an iPad that has not been supervised yet.

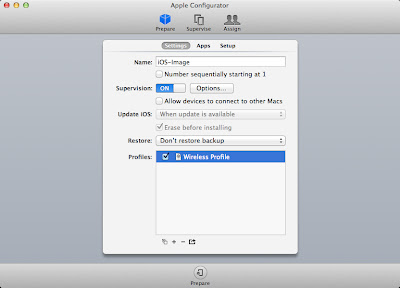
Enter the name of your device, turn Supervision ON, change the Update iOS drop down to When Update is Available.  Erase before installing will be checked by default.

**Note:  Supervising the device will erase all content!**

Set the Restore drop down to Don't restore backup.

I usually apply my wireless profile just to make sure it is working.  This isn't something that will be retained when you make the backup.  In other words, when restoring the backup to another iOS device, the wireless settings are lost.

Click Prepare.

If you haven't entered your organization's information yet, you will be prompted to do so.


If this is the first time you have installed a particular version of iOS on a device, this may take some time since it has to download the IPSW.


2.  Disable Lock Screen Text

I recommend disabling the lock screen text.  In the past I have had the device name be saved as an image when taking the backup.  When this happens all the devices have the same text on the background as well as the text that Configurator adds.  It can easily be enabled after the backup is complete.

To disable lock screen text:

Go to the Apple Configurator menu and click Preferences.

Click the lock screen icon.

Change the Text: radio button to None.


3.  Creating the Backup

When the device has finished the supervision process it should be listed under the Supervise tab in Configurator.

Go through and configure your iPad options such as icon placement, lock screen and home screen picture, etc.

Reconnect the iPad if it isn't already connected.

Click on the Supervise tab.

Select the iPad you wish to backup.

Click on the Restore: drop down menu and select Create Backup...

Enter the name for your backup when prompted and click Create Backup.


4.  Restoring the Backup

Now you can apply the backup to new devices you are supervising.

From the Prepare tab, be sure to change the restore drop down to the name of the backup that was created in step 3.

Be sure to enable the lock screen text that was disabled in step 2 before starting the prepare process.