Thursday, October 8, 2015

Meraki SME Device App Assignment

Apple made a huge announcement at WWDC 15 that iOS 9 would support device app assignment.  Gone are the days of using Configurator, VPP codes and multiple AppleIDs for those of us who manage carts of iPads as well.  Meraki quietly released an update that added this feature to organizations who have Systems Manager Enterprise.  Sorry, if you are still on Legacy Systems Manager this feature will be unavailable.

I've been testing it this week and it has been solid thus far.  I'm going to give a brief overview on the setup below.

Enable Device Assignment

Before you can use Device Assignment you must enable it for your organization.

Go to Organization > MDM

Under the Apple VPP Managed Distribution there is a new column titled Device assignment.  You have the option to disallow access, allow any network, or only specific networks to utilize the VPP licenses.


Assign Apps to Devices

This is where iOS admins will save a lot of time.  Since we no longer need to assign a license to an AppleID, we can go right to the App assignment page.

Go to Systems Manager > Apps

Click Add New > iOS App

Search for an app you already have a VPP license for.  Remember, you need to "purchase" licenses from VPP even if it is a free app.

Click the Add button next to the app you want to add.


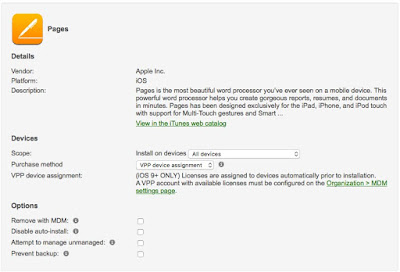
Now we need to set the scope for the app and the purchase method.

First, set the scope for the devices that you want to receive the app.

Next, change the purchase method to VPP Device Assignment

If you want the app to install automatically, make sure the Disable auto-install box is unchecked.

Click Save Changes


The app should now push out to the device within a few minutes.  If you are impatient like me, you can click on the Re-push to missing link to speed things up.

Troubleshooting

  • Device prompts for AppleID
    • Make sure you have VPP licenses available for the apps you are pushing out.
    • Ensure you have enabled the VPP account for device assignment on the correct network.


Tuesday, April 21, 2015

TIE 2015 Slides

Hello everyone,

Thanks for attending the session at TIE 2015 on Meraki Systems Manager.  I have updated the slide deck and made some changes in response to some of the questions from the sessions.

Jordan

Slide Deck

Thursday, January 15, 2015

Disable LanSchool Audio (Speak) Feature on Macs

To disable the ability to listen to the microphone on client computers as well as the ability to speak to client computers follow these steps:


  • Download the installation source from Stone-ware.
  • Launch the lanschool_teacher.dmg and navigate to the Mac > Utilities folder.


  • Double click on DisableAudio.zip to extract the file.
  • Use Apple Remote Desktop to copy the utility to the teacher machines.
  • Copy the utility DisableAudio to the teacher machines.  We use /var/tmp as our location.


  • Run DisableAudio with no parameters to disable the ability to listen or speak with client machines.
  • Use ARD to send a UNIX command to the client to run DisableAudio as root.
  • The teacher will need to quit and relaunch LanSchool for the change to take effect.  The Speak button should now be greyed out in the Teacher console.

Enable the Audio (Speak) Feature


To enable the audio speak feature, we will use the same procedure except for the UNIX command.  This time we want to add the FALSE parameter.


The teacher will need to close and reopen LanSchool for the change to take effect.  The speak button should now be available.